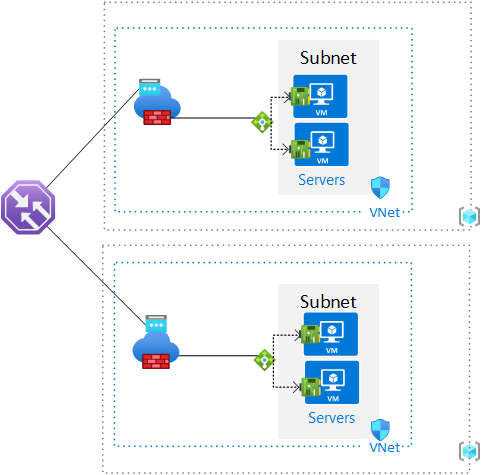
In order to validate a concept of geo-redundant deployment of some servers for remote access, partially following a CAF aligned Landing Zone deployment, I leveraged some Bicep Quickstart templates mixed with some PowerShell code in order to generate the environment automatically. The completed state is a DNS resolveable entry point via Traffic Manager to RDP to a server (you need to specify the desired unique name in the PowerShell code). The Servers are fronted via a private Load Balancer with all of this sitting behind an Azure Firewall (Standard SKU) and then DNAT rules against one of the two Public IP that are attached to the Firewall. Here’s a diagram!

The two Bicep templates I leveraged are:

I took content from the LB template and merged it into the FW & VM template and:

  • Added lines to the “netInterface” resource so the VM NICs would related themselves to a backend pool for the LB.
  • Altered the second DNAT rule to point to the internal IP of the LB.
  • Defined a variable so that a hostname is assigned to public IPs, this is needed for the TM.

The PowerShell “script” is designed to create two resource groups in two separate regions and deploys the same bicep to each one. It then enumerates the second Public IP in each Resource Group in order to create a Traffic Manager profile with the two as endpoints. Be sure to specify a unique name for the “tmdns” variable in the script.

Inbound RDP access to the VMs in un-restricted, in a restricted scenario Firewall rules would be required to allow health probes from the Traffic Manager to reach the internal Load Balancers for the generally published IP address details of Azure Traffic Manager. The Firewall allows traffic out to getmywanip.com and whatsmyip.net.

If Service Tags can’t be used (https://learn.microsoft.com/en-us/azure/virtual-network/service-tags-overview#available-service-tags), refer to Microsoft for info regarding downloadable JSON files of IP address info: https://learn.microsoft.com/en-us/azure/virtual-network/service-tags-overview#discover-service-tags-by-using-downloadable-json-files with the specific page for Azure IP Ranges and Service Tags for Public Cloud at https://www.microsoft.com/en-us/download/details.aspx?id=56519

Always remember to teardown and delete the resource groups when finished testing, the standard SKU Firewall will run up dollars per hour. Tested with Az Module 9.4.0 on Windows 10

Link to Bicep and PowerShell: https://github.com/roity57/Azure-Deploy/tree/main/Geo-Redundant%20Servers%20TM

In my earlier posts I’ve focused on scripts that grab slabs of Powershell output information about Resources to run differential checks against them for the most part in order to see what’s changed for documentation purposes or change control or have historical record of configuration changes for Audit trail and troubleshooting. I’ve now put together a short script using the “Get-AzLog” function to pull out specific activity logs from Azure to see into CRUD activity focusing as the Resource Group for the context. A specific set of fields is focused on for output data to give at bit of an at a glance view in basic CSV form.

Originally I tried Format-Table to nicely display data, however I decided to bind together data from two separate sets of data collections so that I could present the actual user name & IP Address of the person carrying out the action. The issue here was that this data is contained within one of the fields in the Get-AzLog output with it’s own set of keys and value pairs. In order to solve this I referenced a reddit post! https://www.reddit.com/r/PowerShell/comments/62gcdn/combining_two_ps_object_values/ I used the code in this post to merge my two sets of data together and the export-csv the data to a file, I wouldn’t expect the data volumes to be so large to exhaust memory but I imagine my script could be refined to process the data differently or I could simply drop the extract of username and IP Address considering I already have a “Caller” field with some data.

Sample output screen of selected fields, detailed in command below

As a result of using separate sets of data, the Format-Table option was no longer an option as I had separate sets of data to list out. If desired the data can be listed in regular PS form but I chose CSV as a simple effective method to drop all the merged data out into to review in Excel for instance.

The main command that extracts the data is the command below, note the specific fields it grabs. It also extracts the resource name and the whole Claims field but only looks for Operations that contain specific keywords.

Get-AzLog -ResourceGroupName $rg -StartTime $rgdatestart -EndTime $rgdateend | select OperationName, Caller, SubmissionTimeStamp, EventTimeStamp, Status, Category, ResourceProviderName, ResourceGroupName, @{Name="ResourceName";Expression = {$_.ResourceId.tostring().substring($_.ResourceId.tostring().lastindexof('/')+1)}}, Claims | where-object {($_.OperationName -like "*del*") -or ($_.OperationName -like "*create*")}

  1. Get Date/Time and prepare variables to set scope of Log Search (how many days back from today)
  2. Specify the resource group name(s)
  3. Loop through each Resource Group
    1. Prepare Filename to write to (based on resource group name)
    2. Extract specific log data based on timeframe
    3. Loop through each log entry
      1. Extract User Name and IP Address from Claims ($user)
      2. Grab remaining desired fields ($logd)
      3. Merge both sets of $user & $logd together
    4. Output data to local CSV file
Example output CSV Data

This script is a more basic version of another I’ve been working on which like my other scripts, automatically enumerates subscriptions and resources and works through them. Additional items that I’m also working on;

  • Further narrow down the type of user or “thing” that did an activity resulting in log data, for instance, look for a specific user domain name which only caught particular actual human activity instead of system activity.
  • Drop all data for multiple Resource Groups and specify the resource group as a column into a single CSV to pull out in Excel.

You’ll need to set the subscription you desired prior to execution and then set the number of days you want in the $tperiod variable, and set the Resource Group names desired in the $rga variable.

This was written and tested 7.2.5 with Az Module 8.0.0 on a Windows VMs. Some limited regression testing has been done by running this incidentally on earlier PS 5.

I added another function to the “Az-GatherInfoFuncs” script and called it “Get-AzVirtNetDets” which is designed to list subnets including Name, Address Prefix, NSG, Route Table and whether or not BGP Propogation is disabled. Using the specified Subscription name as a parameter it finds all the Virtual Networks within the subscription and for each VNet.

This script is different to the previous ones written which capture this information mostly in default PS Object form for storage and comparison, this particular scripts starts to make intelligible use of the information.

  1. Setup file output environment folders – TenantID\SubscriptionName\VNETDetails.
  2. Enumerate all Virtual Networks within subscription (Get-AzVirtualNetwork | Select Name, @{label=’AddressSpace’; expression={$_.AddressSpace.AddressPrefixes}}, Subnets)
  3. foreach VNet
    1. Grab Subnets and break down details.
    2. Write to screen
    3. Write to file
    4. Run Comparison Function

These were written and tested 7.2.5 with Az Module 8.0.0 on a Windows VMs. Some limited regression testing has been done by running this incidentally on earlier PS 5.

The function is embedded within: https://github.com/roity57/Azure-Gather-and-Compare-Info/blob/master/Modules/Az-GatherInfoFuncs.ps1

If you’re looking for something simpler to quickly get some details out, I referenced https://dev.to/roberthstrand/list-all-vnet-and-subnets-across-multiple-subscriptions-4028 for some insight into what I was working on.

I added another function to the “Az-GatherInfoFuncs” script and called it “Get-AzDNSDetails” which is designed to export the DNS records from Azure both Azure Public and Private DNS zones. Using the specified Subscription name as a parameter it finds all the DNS Zones within the subscription and for each zone then just fetches the records using Get-AzDnsRecordSet and writes the details out to text file in default format as well as in table format.

  1. Setup file output environment folders – TenantID\SubscriptionName\PublicDNSZones and\or PrivateDNSZones.
  2. Enumerate all DNS Zones within subscription (Get-AzDnsZone / Get-AzPrivateDnsZone)
  3. If Public DNS Zones exist, cycle through each zone.
    • Get DNS Records (Get-AzDnsRecordSet)
    • Write to file in default format (DDMMYYYY-hhmm-zone.txt)
    • Write to file in Table format (DDMMYYYY-hhmm-zone-table.txt)
  4. If Private DNS Zones exist, cycle through each zone.
    • Get DNS Records (Get-AzPrivateDnsRecordSet)
    • Write to file in default format (DDMMYYYY-hhmm-zone.txt)
    • Write to file in Table format (DDMMYYYY-hhmm-zone-table.txt)

This particular function does not call the file comparison function at https://github.com/roity57/Azure-Gather-and-Compare-Info/blob/master/Modules/CompareFunc.ps1 but this can be used to run comparisons between exports to identify where changes may have occurred.

Most scripts have been tested in PS 5 & 7 across Az Module 4.x and 6.x on Windows VMs.

Continuing on from my previous post, I updated that script a little and also developed a new augmented version to synchronise an external list of CIDR prefixes either directly from Azure BGP ranges or a text file.

Script located on Github at https://github.com/roity57/Azure-Gather-and-Compare-Info/blob/master/AzRouteTableSync.ps1

The script is designed to read in the source list of CIDR Prefixes in the format of one prefix per line EG: 13.77.0.0/24. It will check the destination Route Table to see if any of the source list prefixes are new, and if so it will add them in. Then it will do another pass to see if there are Route Table entries that don’t exist in the source list and if so, it will remove the Route Table entries. The specific use case is maintaining a single Azure Route Table in a subscription maintained in sync dynamically with an external source, it’s not for maintaining a Route Table in sync with multiple dynamic sources. If you want to use it for this use case, then the various sources would need to be amalgamated into a single source via another script of somesort, so you could stage the input source first – I might do this as one of my next exercises 😉

If a BGP community is used then the process is as follows:

  1. If BGP Name specified
    • Fetch the desired BGP table CIDR prefixes from Azure
    • Fetch the actual BGP number details such as 12076:51016
    • prepare the route name format.
  2. If Not BGP route table, read CIDR list from specified text file
  3. Fetch the Azure Subscription Route Table
  4. Extract the Address Prefixes specifically
  5. Foreach loop BGP or file sourced list of prefxies;
    • Assemble remainder of route table name entry
    • Array “-contains” search if the route already exists and record boolean result
    • If boolean result False, add route to route table configuration variable
  6. Foreach Cycle through the Routes in the Route Table in Azure
    • Array “-contains” search if the route exists in the source and record boolean result
    • If boolean result False, remove the route table entry from configuration variable
  7. Once the list has been cycled, commit the new routes to Azure. If the commit to Azure fails then Azure will report an error and the script will also notify.

I previously used a nested foreach loop to search through the source list the script ingests but simplified this by replacing it with the use of the “-contains” parameter on the array.